
![]()
If you’re new to customising your Second Life avatar with mesh heads and bodies and you’ve maybe been playing around with demos (or with one of the generous gift heads and/or bodies that creators sometimes give away), you’ve probably already realised that it’s not as simple as ‘Wear shape, wear head, wear body, and you’re done’. In fact, if you’ve followed that very simple guidance, you might be looking a bit… odd. The simple fix for that is to wear the shape included with your mesh head instead of the shape included with your mesh body, but… what if you don’t like what that ‘mesh head shape’ does to your body? This post will help you get that fixed in no time at all.
But first…
The terminology for avatar customisation in Second Life can trip up a lot of people, especially newbies. I’ve seen many people who confuse shapes with mesh bodies, which – if I think about it – kind of makes sense. I mean, in a manner of speaking a mesh body is a shape (it has shape to it, after all). But that’s not how it works in SL, so we’re going to begin with the basics, and that means… it’s glossary time!
Shape
A shape is a list of numbers that sets the parameters for your underlying avatar skeleton and physique. It alters things like how tall you are, how long your legs are, how much body fat or muscle you have, how high your cheekbones are, etc etc. Think of the shape as being akin to everything underneath your RL skin: your skeleton, and also to some extent your muscle and fat (although in Second Life muscle and fat can also be affected by which mesh body you choose). You can edit your shape by right-clicking your avatar and choosing ‘edit shape’ under the appearance options.
The image below is from my recent review of the ‘Kario’ mesh body by Inithium. From left to right, we have the three included ‘fit’ body shapes, and on the far right we have my own edit of the third included shape. The mesh body is the same, and the skin is the same; only the shape parameters have been changed, using the Edit Shape sliders:

Of crucial importance here is the fact that you can only wear one shape. At this point you might be scratching your head over the title of this blog post, and muttering, “But Skell, you’re talking about head shapes and body shapes, and now you’re telling me I can only have one shape?!”
Yep. Bear with me a bit ;-)
Skin
A skin is the layer that goes over the top of the shape and gives it texture. It can add the illusion of altered physique (e.g. a six pack of muscles) via its texturing, but it doesn’t physically alter the underlying shape. Think of the skin as being visually the same as your RL skin. It’s technically a ‘paint job’ for the ‘chassis’ that is your underlying shape.
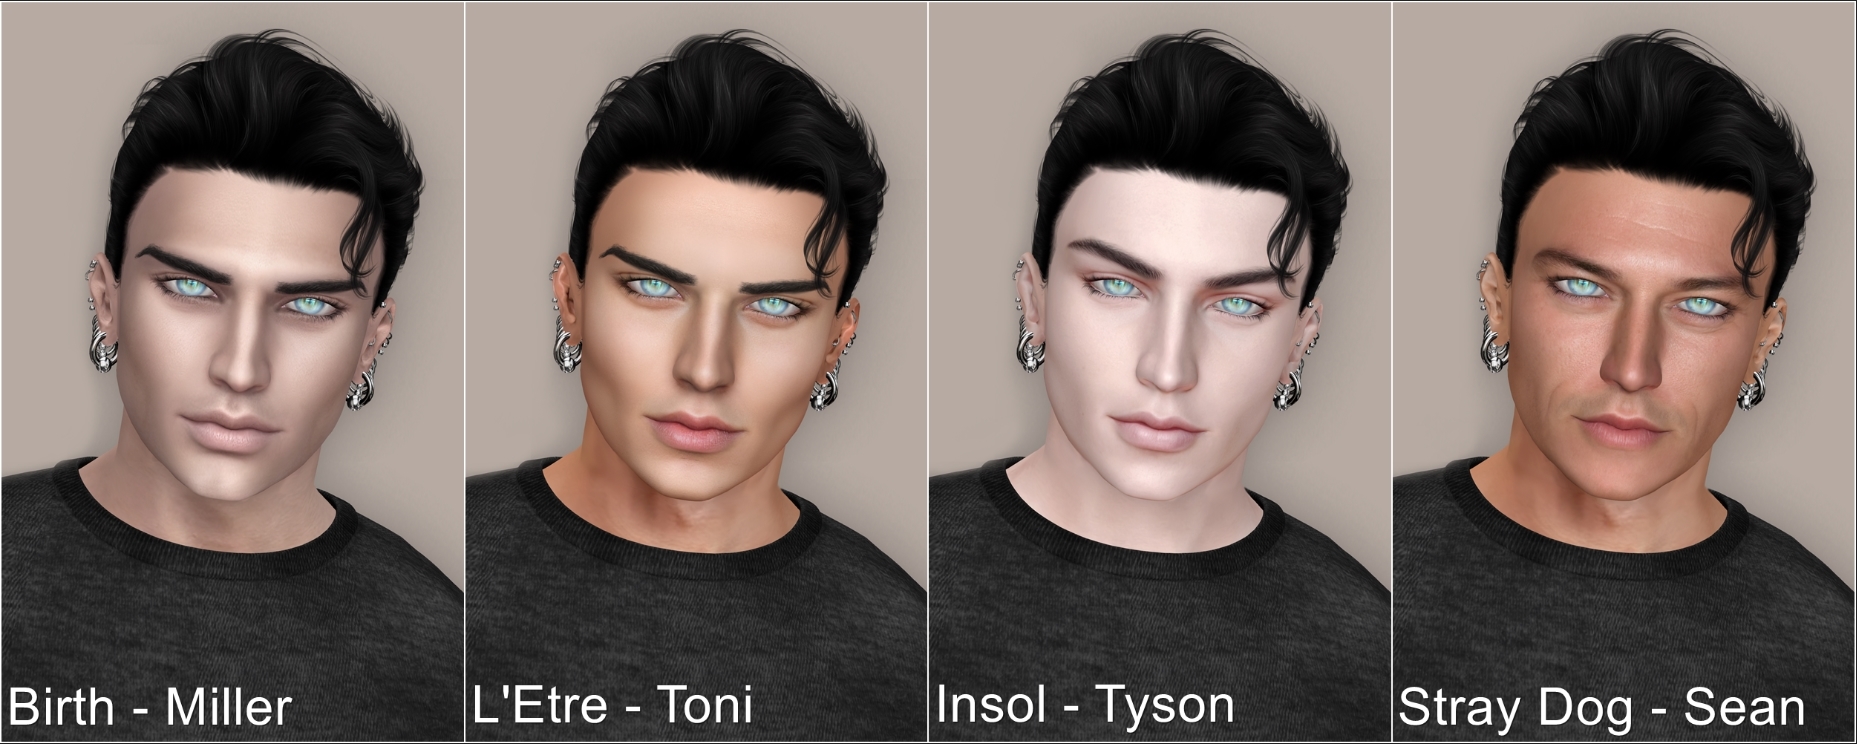
The image below shows four different skins on the same mesh head (which has the same underlying shape). Note how each skin changes the way the head looks, down to the point where it also changes how old the avatar looks:
System Avatar (sometimes called the ‘classic avatar’)
The system avatar is the one you start out with in Second Life. At its absolute basics, it comprises a shape, a skin, a pair of eyes, and a hairbase. These four system items are essential for every avatar, and you cannot take them off (if you could, then your avatar wouldn’t rez properly). You can read more about the system avatar here.
Mesh Body
A mesh body is an object that you wear over the top of your system avatar. It has much finer detail than the system avatar, especially around the hands and feet. There are many different types of mesh body, from many different creators, and – once you’ve chosen one – you will usually need to look for clothing that is created specifically for that body. This is why you’ll see multiple brand logos on various clothing items; those logos denote which bodies they will fit properly to.
Most mesh bodies can be altered by changing the underlying system shape parameters using the ‘edit shape’ sliders, as mentioned in the ‘shape’ section of this glossary. However, mesh bodies all start out with a specific 3D mesh model, which will limit what you can do with the shape, to some extent. For example: if you start out with an extremely skinny mesh body, you will not be able to edit the underlying shape to make that skinny body look extremely muscular. (Remember the bit in the ‘shape’ section, above, where I said that muscle and fat can be affected by which body you choose? This is that bit in action.)
Mesh Head
Like a mesh body, a mesh head is an object that you wear over the top of your system avatar. Again, it has much finer detail than the system head, and some mesh heads have HD (high definition) texture capability, allowing you to create some realistic looks.
Also like mesh bodies, mesh heads are available from several different creators, and within those creators’ brands you will find multiple mesh heads, sometimes in different types: basic, frames animated, Bento, and HD types.
Basic and frames animated heads cannot have their shape customised by editing the sliders of the underlying system shape, as they only respond to the basic ‘stretch’ sliders. Bento and HD types of head can be customised by editing the sliders of the underlying system shape, and it’s these types of head that we’ll be dealing with here, as they’re the ones currently being released by creators.
Hopefully now you have a better understanding of the basic difference between shapes, mesh bodies, mesh heads, and skins. So we’re going to move on into the meat-n-potatoes of this post, which is: how to transfer your preferred body shape onto your head shape.
As mentioned earlier in this post, you can only wear one shape. But if you have a mesh head and a mesh body, you will very likely have two shapes to choose from: one in the mesh head’s inventory folder, and one in the mesh body’s inventory folder. We’re going to look at three hypothetical examples now:
- You try on the shape from the mesh body’s folder, and you really like how it looks. But it does horrible things to your mesh head, and makes your face look like a monster!
- You try on the shape from the mesh head’s folder, and you love how it makes your mesh head look, but you hate the fact that it makes your body look too short or too tall, or bow-legged, or any other thing that you don’t like
- You have an existing body shape that you already love, but when you put on the mesh body and head over the top of it the mesh body looks fine but the mesh head looks awful!
All three of those scenarios have one thing in common: you have a mesh body shape that you prefer – either your own existing body shape, or the one from the mesh body’s folder – so you’d much rather wear that if you can. But it makes your head look freaky-weird. Why is that happening?
Well, mesh body creators don’t know which of the hundreds of mesh heads in Second Life you want to wear, so all they can do is give you a shape that makes their product – the mesh body – look good. They will probably have made some edits to the head part of the shape, but those are likely to be specific to their own preferred head, or even to a system head, so there is very little guarantee that they will work on your specific choice of mesh head.
All heads that are Bento-rigged will respond to the underlying shape sliders. The creators of those heads include at least one ‘starter shape’ in the head’s inventory folder, which is intended to give you the ideal ‘starting parameters’ for the head’s sliders. This should mean that the included shape will make your head look like the one in its advertisement.
A sidenote here: I’m talking about the 3D mesh shape of the head, and not necessarily the texture of the head. A large number of mesh head creators will advertise their creations showing a couple of different skin textures on the head, as well as a plain white or grey 3D model shape, so you can get an idea of the head’s parameters without the distractions that a skin texture can provide. Remember the image near the top of this post, where I show four different skins on the same head? I’ll post it again, below:
![]()
If you were after a youthful look, but the ad image showed the skin on the right, you might not even bother trying the demo, since that Stray Dog skin makes the head look much older than the Insol skin does. But it’s exactly the same head! The skin textures really can make that much of a difference, which is why some creators will also sometimes show a blank white model of the head, so you can see the general shape of it.
So, after that little diversion, back to the conundrum of two shapes. A reminder: you have a body shape that you love, but you understand that the shape included with your mesh head is the ideal one to make that head look good (or, at least, to use as a canvas for your own personalisation tweaks to the shape sliders). So how do you fix this?
Simple: you merge the shapes. You don’t need any specific programs to do so, or any particular skills. All you need is a bit of paper and a pen or pencil, or you can even create a new notecard in your inventory and type into that, or any text file on your computer. In short: you’re gonna write down some numbers!
First of all, wear the body shape that you prefer, be that your own personal shape, or the one included in the mesh body’s folder. Now, right-click your avatar, find the Edit Shape option in the menu that pops up, and select it. You’ll find yourself with a window that looks a bit like this:
![]()
Well, as mentioned in the text there, yours won’t look quite like that. Yours will have little preview images of your avatar in them. These preview images will show you what happens to your avatar when you move each slider. It doesn’t matter if they’re there or not – you can do this perfectly well with them as you can without – I just prefer not to have them there, as it means less scrolling for the next step.
You need to focus on three tabs:
- Body
- Torso
- Legs
Those contain all the slider settings that affect the body section of your worn shape (which is currently the body that you like). On your bit of paper/notecard/text file/etc, write a header of ‘Body’ and then just write down all the slider numbers that you see, in order, going down the list.
No need to write down the name of each slider (unless you want to!) – just jotting down the numbers is enough, although don’t miss any numbers out. Read them back while checking them on your screen, if you need to.
Leave a bit of a gap, then write a header of ‘Torso’ and write down all the slider numbers on the Torso tab, again in order going down the list. Lastly, do the same for the ‘Legs’ tab. Make sure you save that bit of paper/notecard/text file/etc somewhere safe.
You can now come out of the Edit Shape window by clicking the X at the top.
Go into your mesh head’s folder, and now wear the shape included there (the one where you like what it does to your head, but not what it does to your body).
Once again, right-click your avatar and find the Edit Shape option.
Grab hold of the list of numbers that you noted down from the previous shape, and input them into the relevant places on the relevant tabs of this shape. Fill in all three tabs: Body, Torso, and Legs, changing the numbers – going down the list, in order – to the ones that you wrote down from the previous shape.
When you’re done, you should have the ideal head shape – as defined by the mesh head’s creator – together with your preferred body shape. All you need to do now is click SAVE AS at the bottom of the Edit Shape window, give the shape a new name (I suggest using the name of the mesh head, and then adding “my body shape” or something similar, to differentiate it from the original ‘starter shape’ in the mesh head’s inventory folder). Adding the date that you changed the shape is also a good idea.
And that’s the gist of how you merge shapes to put your preferred body shape onto a mesh head shape. There are more complicated ways of doing this – ones that involve exporting your shape and messing around with .XML files – but since this is a ‘Basics’ post I didn’t want to include anything that might cause confusion!
A word of caution…
One thing to watch out for when you’re changing your body shape, and that’s the overall size of your head compared to your body size. It’s very easy to add your usual ‘tall and broad’ body shape parameters to your mesh head shape, and not realise that your shoulders are now five or six times the width of your head, which now looks like a little thumb on top of your body! You may need to increase the ‘head size’ slider parameter under the ‘head’ tab of the shape, so that you remain proportionate.
I’ve been seeing a lot of guys lately with very small heads compared to their big, broad bodies, so this is something you need to ensure doesn’t happen to you! Just keep pulling your camera back and eyeballing yourself from a distance, to check that your head and torso are in proportion with each other.
Lastly… how do you remove those little preview images, Skell?
The preview images cannot – to the best of my knowledge – be removed in the stock Linden Lab viewer, but they can definitely be removed in the Firestorm viewer. I find it much easier to have all the sliders on one screen, without having to scroll past all the images to get to the next one. Here’s where you disable those images, in the Firestorm viewer’s Preferences panel:
![]()
(This option may be available on other third party viewers, but I’m only familiar with Firestorm.)